Barriers
Mark Allison
 v3.0 canary 3
All of the examples in this article have been created using Android Studio v3.0 canary 3.
v3.0 canary 3
All of the examples in this article have been created using Android Studio v3.0 canary 3.
You may see differences if you are using a different version.
 v1.1+
All of the examples in this article have been created using ConstraintLayout v1.1+.
v1.1+
All of the examples in this article have been created using ConstraintLayout v1.1+.
You may see differences if you are using a different version.
Barriers
When we are creating Android layouts, sometimes we encounter situations where the layout can change depending on the localisation. Here is a really simple example:
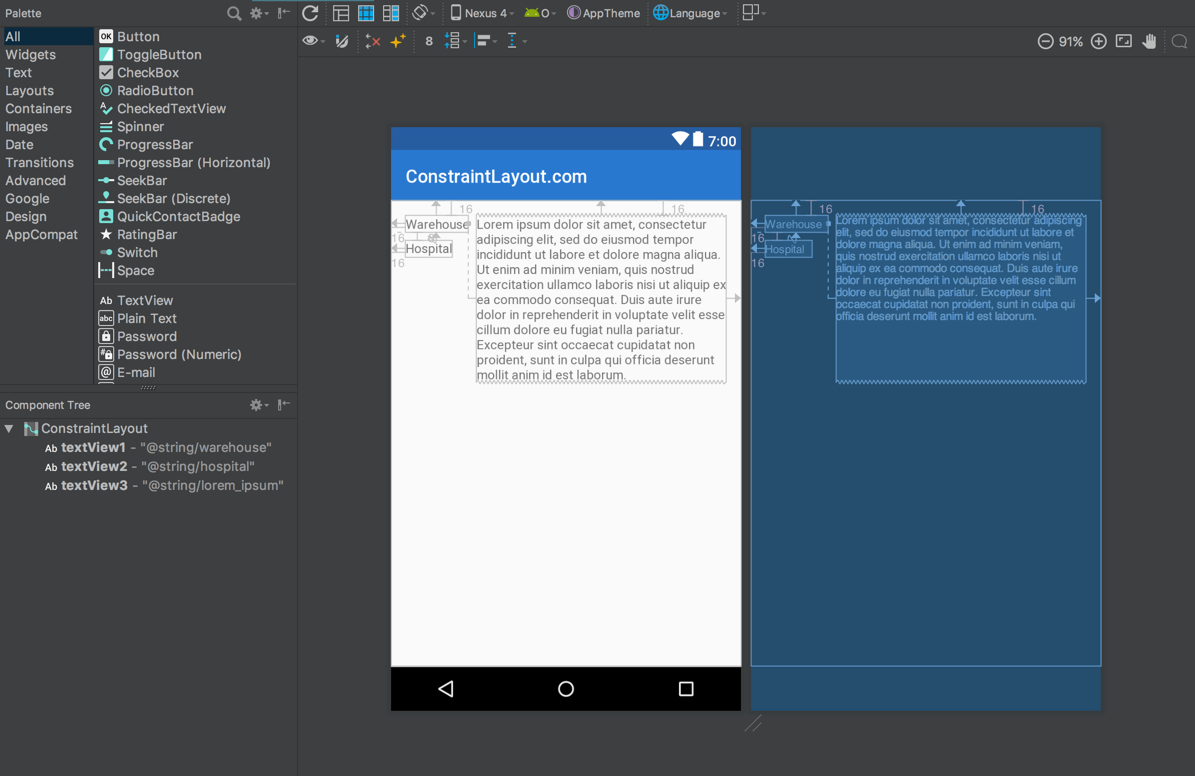
Here we have three TextViews: textView1 and textView2 on the left; and textView3 on the right. textView3 has been constrained to the end of textView1 and this works perfectly — it positions and sizes textView3 exactly as we need it.
However, things become more complicated if we need to support multiple languages. If we add a German translation then we have a problem because in the English version the text in textView1 is longer than that in textView2, whereas in German the text in textView2 is longer than that in textView1:
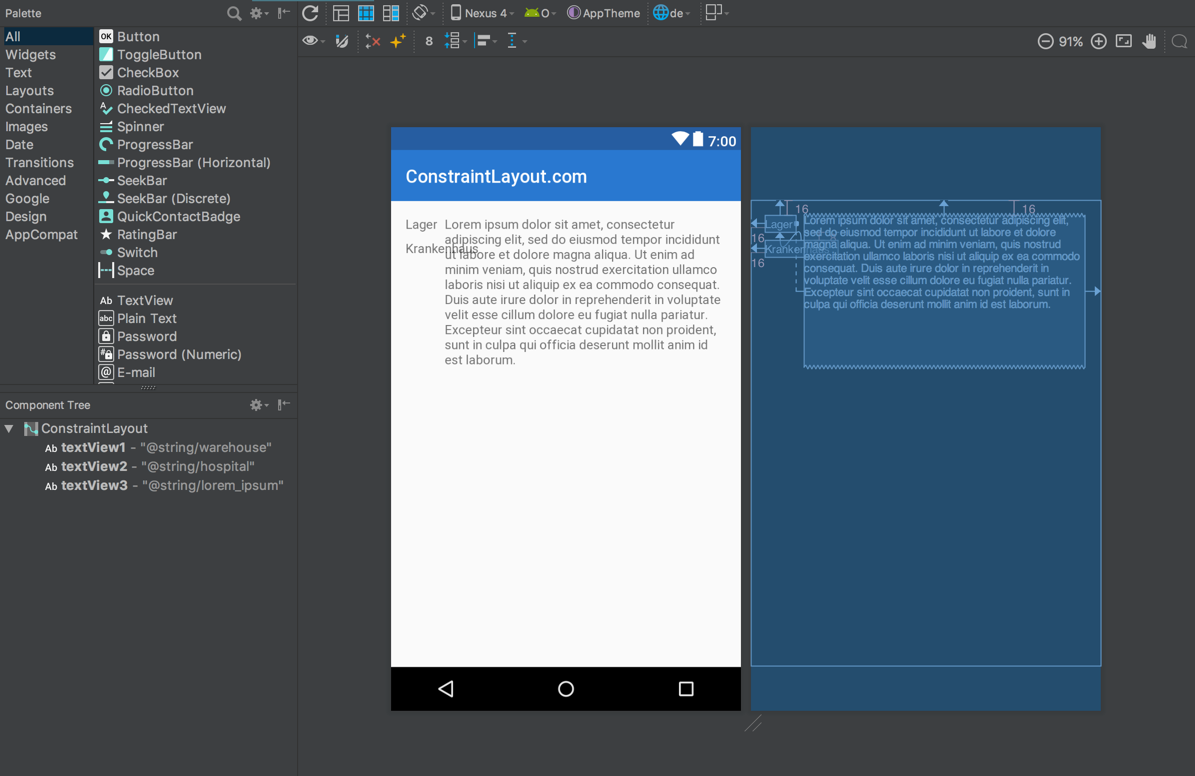
The problem here is that textView3 is still constrained to textView1 and so textView2 is now running in to textView3. This is seen most clearly in the Design view (the one with the white background).
The obvious solutions to this would be to either use TableLayout, or to wrap textView1 & textView2 inside a vertical LinearLayout with android:layout_width="wrap_content" and then constrain textView3 to the end of this LinearLayout. But there is a better way: Barriers.
A Barrier is a virtual view, similar to a Guideline, to which we can constrain objects. The difference between a Barrier and a Guideline is that the position of a Barrier is determined by the dimensions of multiple views. In the case of our example, we don’t know whether textView1 or textView2 will be wider, so we can create a Barrier based upon the widths of these two Views. Then we can constrain textView3 to the Barrier.
Creating Barriers in the editor
Setting up barriers requires a few steps. First we create a vertical barrier by selecting Add Vertical Barrier from the context menu:
You can see the Barrier that is added to the component tree (the lower left panel).
We can optionally change its position within the layout hierarchy by dragging it within the component tree:
Next we need to set the direction for the Barrier. In our case we want to position the Barrier relative to the End of either textView1 or textView2 depending on whichever is the larger, so we need to specify a direction of end:

The final step in defining the Barrier is to tell it which Views we need to position it relative to. We don’t use a constraint here because a constraint is actually a one-to-one mapping, and here we have multiple Views. For a Barrier we need to define multiple Views as referenced IDs, which we can do by dragging them within the component tree:
 These references are listed as children of the
 Barrier in the component tree once they have been defined. If you watch the Blueprint view (with the blue background) in that video, you will see the Barrier jumps in to position (the dotted vertical line which moves from the left edge) as the references are created.
Now that the Barrier has been defined, all that remains is to change the constraint of textView3 to be relative to the Barrier rather than textView1:
textView3 is positioned to the end of textView2 once the constraint is changed.
To see how this affects things overall, we can now toggle the language selection and see that the Barrier is now positioned to the end of whichever one of the referenced Views (textView1 or textView2) is the wider:
Creating Barriers in XML
The XML for this is actually pretty simple:
<?xml version="1.0" encoding="utf-8"?>
<androidx.constraintlayout.widget.ConstraintLayout
  xmlns:android="http://schemas.android.com/apk/res/android"
  xmlns:app="http://schemas.android.com/apk/res-auto"
  android:layout_width="match_parent"
  android:layout_height="match_parent">

  <TextView
    android:id="@+id/textView1"
    android:layout_width="wrap_content"
    android:layout_height="wrap_content"
    android:layout_marginStart="16dp"
    android:layout_marginTop="16dp"
    android:text="@string/warehouse"
    app:layout_constraintStart_toStartOf="parent"
    app:layout_constraintTop_toTopOf="parent" />

  <TextView
    android:id="@+id/textView2"
    android:layout_width="wrap_content"
    android:layout_height="wrap_content"
    android:layout_marginStart="16dp"
    android:layout_marginTop="8dp"
    android:text="@string/hospital"
    app:layout_constraintStart_toStartOf="parent"
    app:layout_constraintTop_toBottomOf="@+id/textView1" />

  <androidx.constraintlayout.widget.Barrier
    android:id="@+id/barrier7"
    android:layout_width="wrap_content"
    android:layout_height="wrap_content"
    app:barrierDirection="end"
    app:constraint_referenced_ids="textView2,textView1" />

  <TextView
    android:id="@+id/textView3"
    android:layout_width="0dp"
    android:layout_height="wrap_content"
    android:layout_marginStart="8dp"
    android:text="@string/lorem_ipsum"
    app:layout_constraintStart_toEndOf="@+id/barrier7"
    app:layout_constraintTop_toTopOf="parent" />

</androidx.constraintlayout.widget.ConstraintLayout>
The only thing specific to Barrier is the Barrier element itself. The app:barrierDirection attribute determines the direction of the Barrier - in this case it will be positioned at the end of the referenced Views.
The list of referenced Views is a comma separated list of the IDs of other Views within the layout (without the @+id/ qualifier).