Chains
Mark Allison
 v2.4 alpha 7
All of the examples in this article have been created using Android Studio v2.4 alpha 7.
v2.4 alpha 7
All of the examples in this article have been created using Android Studio v2.4 alpha 7.
You may see differences if you are using a different version.
 v1.1+
All of the examples in this article have been created using ConstraintLayout v1.1+.
v1.1+
All of the examples in this article have been created using ConstraintLayout v1.1+.
You may see differences if you are using a different version.
What are chains?
Chains are a specific kind of constraint which allow us to share space between the views within the chain and control
how the available space is divided between them. The closest analogue with traditional Android layouts is weights in
LinearLayout, but chains do far more than that, as we shall see.
Creating a chain
As we have already mentioned, a chain consists of multiple views, so to create a chain we must select the views we wish to chain together, and then select either ‘Center Horizontally’ to create a horizontal chain, or ‘Center Vertically’ to create a vertical chain. Let’s create a horizontal chain from three views:
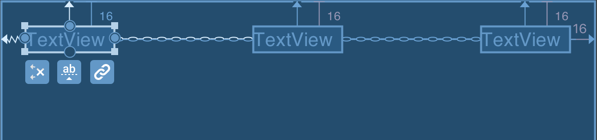
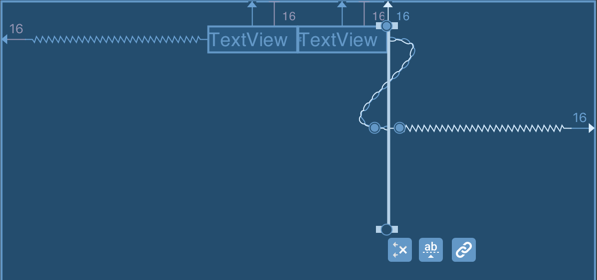
The first thing worth mentioning is that the two views at the ends of the chain (in this case the leftmost and rightmost views) already have constraints from their left & right edges respectively, to the parent. The creation of the chain simply defines the inter-relationships of the members of the chain. If we look at the chain that we have just created, there are a couple of visual representations that are worth explaining:
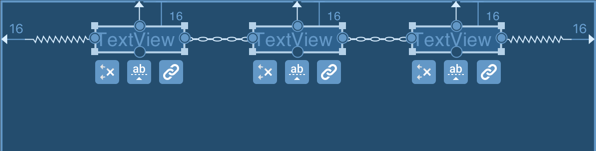
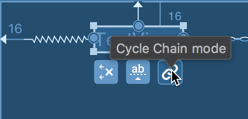
Firstly note that the two connections between the views resemble a chain (these are the chain constraints which we have just created), and the outer two connections (between the leftmost and rightmost views and the parent) resemble springs. These outermost connections denote the “chain mode” which has been applied to the chain. The “chain mode” specifies how the chain will fill the available space, and we can cycle between the three available modes using the “cycle chain mode” button which appears below all of the members of the chain:
There are three possible modes: spread, spread_inside, and packed.
Spread Chain
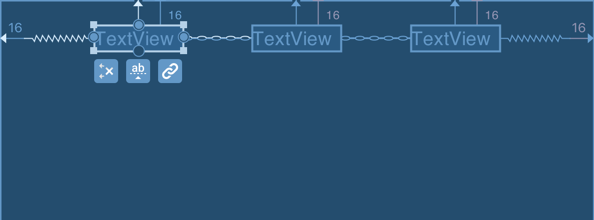
The default mode is spread mode, and this will position the views in the chain at even intervals within the
available space:
Spread Inside chain
The next mode is spread_inside which snaps the outermost views in the chain to the outer edges, and then positions
the remaining views in the chain at equal intervals within the available space:
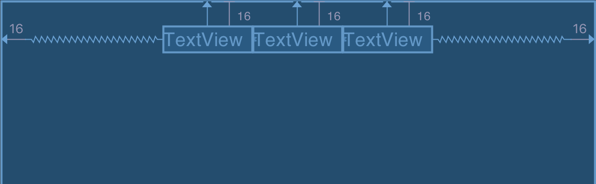
Packed Chain
The final mode is packed which will pack the views together (although you can provide margins to separate them
slightly), and then centres the group within the available space:
With a packed chain, the positioning of the packed views can be further controlled by altering the bias value - in this
example the bias is set to 0.5 which will centre things. But altering this value can change the position of the
packed chain:
Spread Chain Weights
One really useful feature of both spread and spread_inside chains is that we can apply weights to individual
members of the chain and we get very similar behaviour to weights in LinearLayout. Currently there is no direct
way of doing this in the editor, but we can use the properties view to change attributes manually.

To apply a weight to a specific View we must first select the View in the editor, and then
(if the View is in a horizontal chain) specify a android:layout_width="0dp" and
app:layout_constraintHorizontal_weight="1":
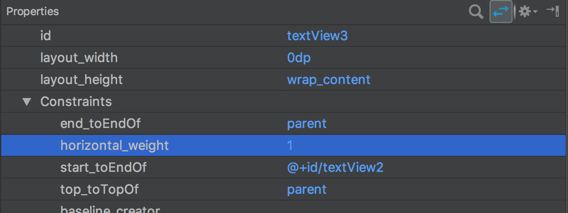
Note how the appearance of the View changes in the blueprint view - the top and bottom edges change from straight lines
in to become accordion-like - this gives a visual indication of a weighted View.
It is also worth noting that weights do not play nicely if we try to use them in packed mode. Whereas spread and
spread_inside modes will use as much space as they need, packed mode will try and pack things in to the smallest
possible space. If you attempt to use weights in a packed chain then the weighted views will shrink to zero size:
Chains in XML
It would be reasonable to assume that dedicated attributes exist in order to specify chains in XML, but this is not, in fact, the case. Instead the existing constraint attributes are combined. To create chains in XML the chain constraints are simply two way, complementary constraints. Here is the XML for the initial chain creation that we looked at earlier:
<?xml version="1.0" encoding="utf-8"?>
<androidx.constraintlayout.widget.ConstraintLayout
  xmlns:android="http://schemas.android.com/apk/res/android"
  xmlns:app="http://schemas.android.com/apk/res-auto"
  xmlns:tools="http://schemas.android.com/tools"
  android:layout_width="match_parent"
  android:layout_height="match_parent"
  tools:context="com.stylingandroid.scratch.MainActivity">

  <TextView
    android:id="@+id/textView"
    android:layout_width="wrap_content"
    android:layout_height="wrap_content"
    android:layout_marginStart="16dp"
    android:layout_marginTop="16dp"
    app:layout_constraintEnd_toStartOf="@+id/textView2"
    app:layout_constraintHorizontal_chainStyle="spread"
    app:layout_constraintStart_toStartOf="parent"
    app:layout_constraintTop_toTopOf="parent"
    tools:text="TextView" />

  <TextView
    android:id="@+id/textView2"
    android:layout_width="wrap_content"
    android:layout_height="wrap_content"
    android:layout_marginTop="16dp"
    app:layout_constraintEnd_toStartOf="@+id/textView3"
    app:layout_constraintStart_toEndOf="@+id/textView"
    app:layout_constraintTop_toTopOf="parent"
    tools:layout_editor_absoluteX="141dp"
    tools:text="TextView" />

  <TextView
    android:id="@+id/textView3"
    android:layout_width="wrap_content"
    android:layout_height="wrap_content"
    android:layout_marginEnd="16dp"
    android:layout_marginTop="16dp"
    app:layout_constraintEnd_toEndOf="parent"
    app:layout_constraintStart_toEndOf="@+id/textView2"
    app:layout_constraintTop_toTopOf="parent"
    tools:text="TextView" />

</androidx.constraintlayout.widget.ConstraintLayout>
On textView there is app:layout_constraintEndToStartOf="@+id/textView2"; and on textView2 there is
app:layout_constraintStart_toEndOf="@+id/textView" - essentially creating two constraints between the same pair of
anchor points in opposite directions. It is this which defines a chain.
Also on textView there is app:layout_constraintHorizontal_chainStyle="spread" which specifies the spread mode; you
can manually set this to spread_inside or packed to specify different chain modes. This must always be done on the
View at the head of the chain - in other words the first item in the chain.
We can set a bias on the chain by setting app:layout_constraintHorizontal_bias="0.75" with a value between
0.0 and 1.0.
Finally, we can define weights by specifying android:layout_width="0dp" and then
app:layout_constraintHorizontal_weight="1".